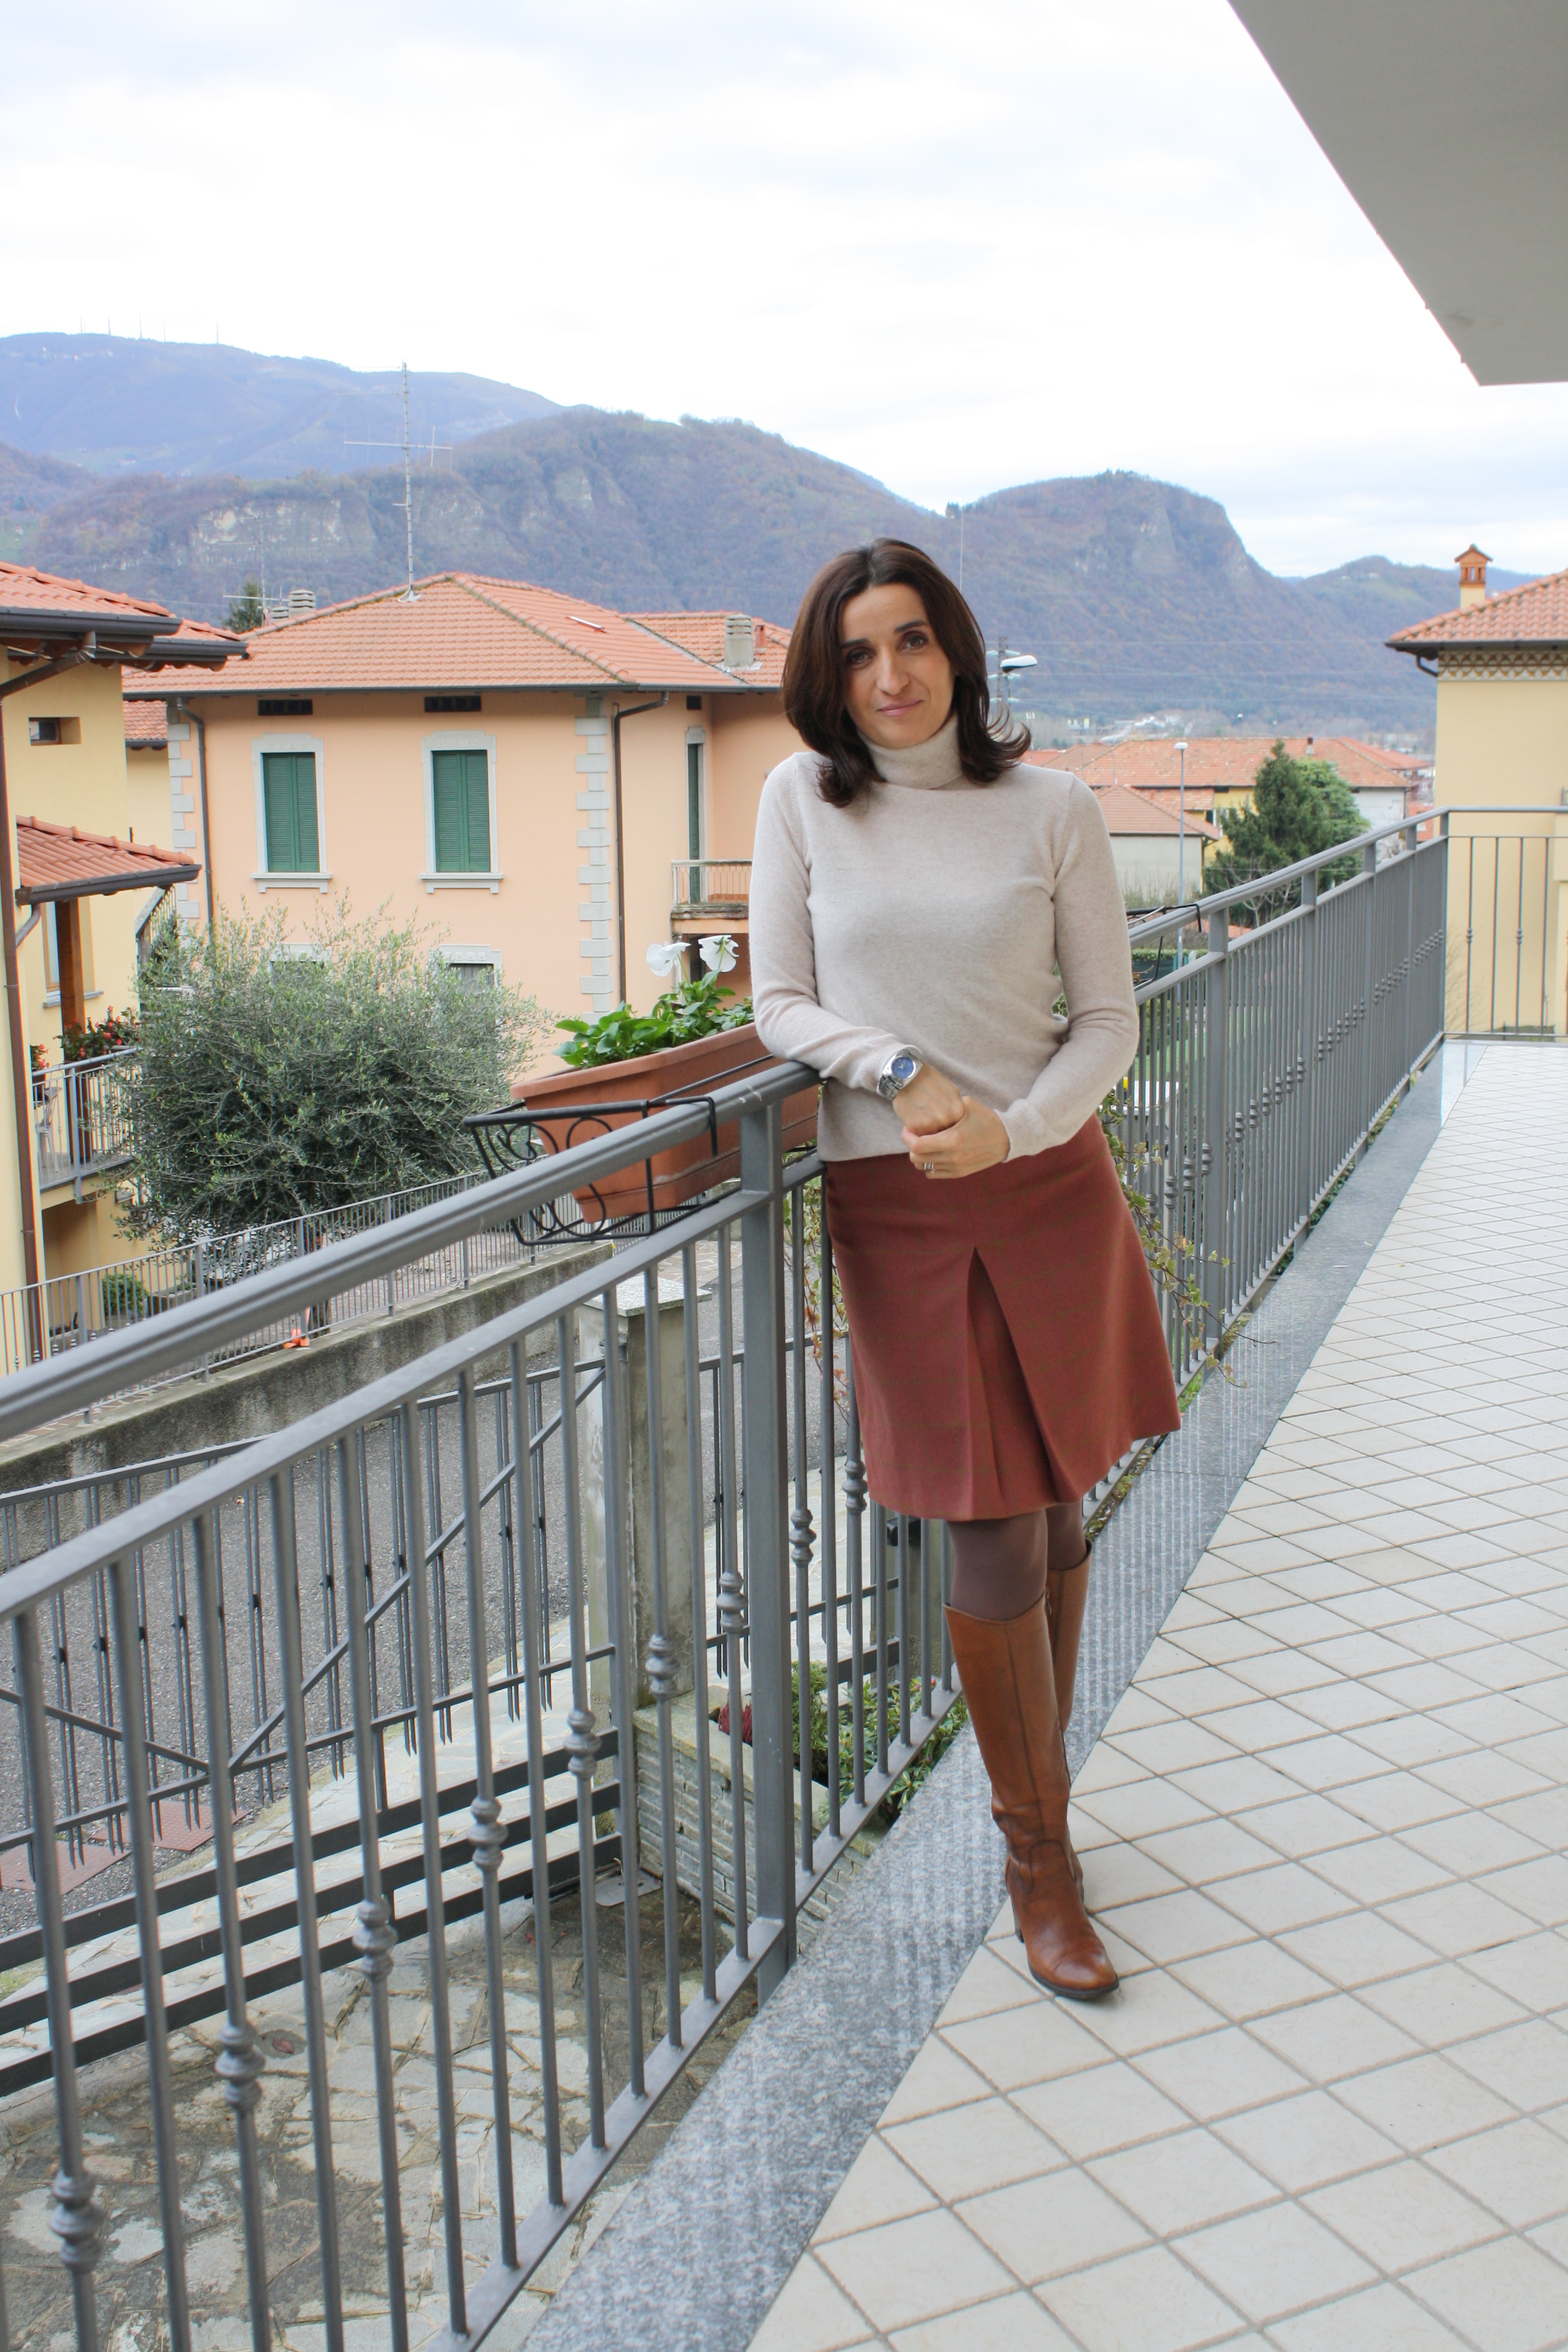
Quando ho ripreso a cucire, qualche anno fa, mi sono sbarazzata di tutte le gonne che avevo, un po’ perché non mi rappresentavano più, erano tutte in stile etnico , un po’ perché volevo confezionarmi da sola le mie gonne.
When I started to sew a few years ago, I got rid of all the skirts I had, a little ‘because I do not represented more, were all in ethnic style, a little’ because I wanted confezionarmi alone my skirts.
L’anno scorso in verità ho abbandonato questo progetto, perché durante il corso di cucito ho preferito concentrarmi nella confezione di capi con i quali avevo poca dimestichezza.
Per questo motivo il primo capo invernale che ho realizzato è stato proprio una gonna.
Last year, in truth I abandoned this project, because during the sewing course I preferred to concentrate in the pack of leaders with whom I was unfamiliar.
For this reason, the first head of the winter that I made was a skirt.


Prima di scegliere ho curiosato un po’ in internet.
Before choosing I poked around a bit ‘on the internet.

Max & Co
E mi pareva che il mio scampolo di cashemire si prestasse bene per questo modello.
It seemed to me that the remnant of my cashmere sweater would lend itself well to this model.

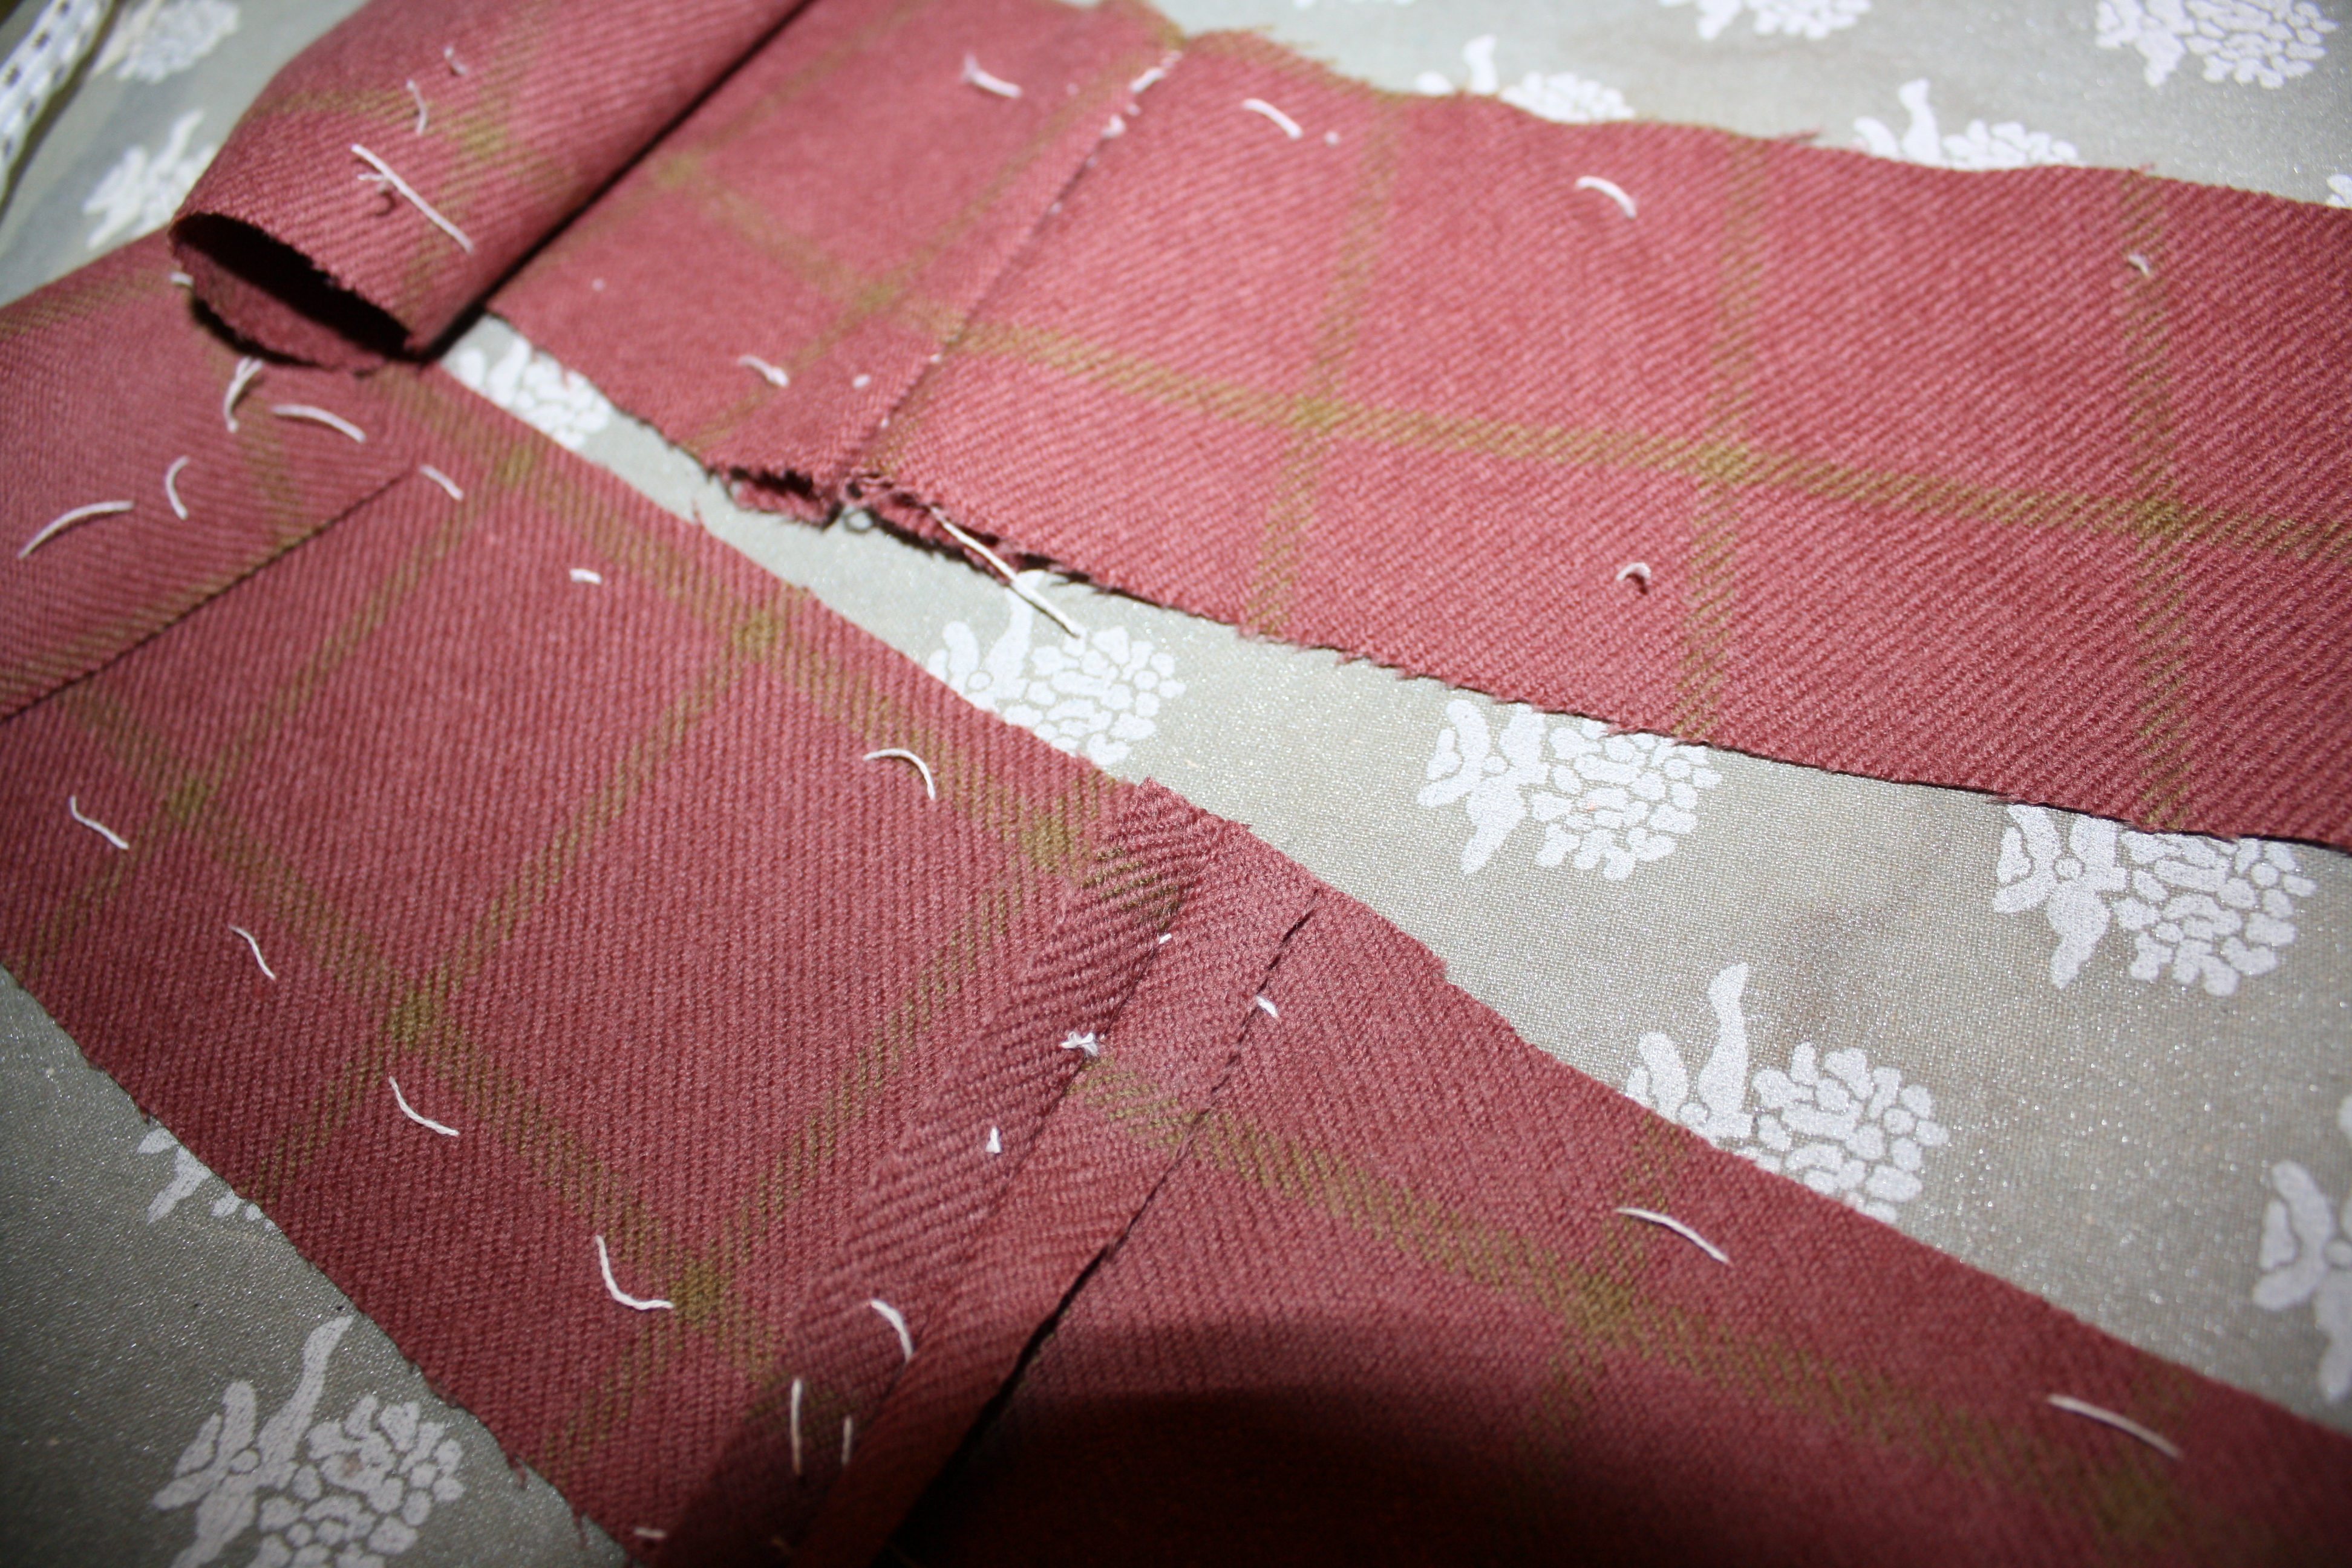
Ho preparato un tutorial per mostrarvi il taglio della stoffa, che riservo al prossimo post e vi mostro invece il disegno e taglio della cintura.
Ho disegnato la cintura direttamente sulla stoffa usando il cartamodello di carta, ho piegato il rettangolo per lo sfondo piega, in questo modo è rimasto solo il modello per il davanti della gonna.
Qui sotto vedete il modello davanti completo di sfondo piega.
I have prepared a tutorial to show you the cut of the cloth, I reserve the next post and I show you instead design and cut the belt.
I designed the belt directly on the fabric using the pattern of the paper, I bent the rectangle for the background fold, so we have only the template for the front of the skirt.
Below you see the pattern before full background fold.

Qui sotto il modello davanti senza sfondo piega.
Below the model without front pleat.

Ho unito le pinces sia per il davanti sia per il dietro.
I joined pleats for both the front and the back.

Ho disegnato con il gessetto il cinturino davanti, una volta nella piegatura della stoffa.
I drew with chalk in front of the strap, once in the fold of the fabric.

E il dietro.
And behind .

Poi ho sposato i due cartamodelli, li ho posizionati più in basso, e ho disegnato altri due cinturini, la due parti in alto servono per la parte esterna della cintura, le due parti più in basso servono per la parte interna della cintura. Ho passato le marche e poi ho tagliato le 4 parti della cintura con un margine di cucitura di circa mezzo centimetro.
Then I married the two patterns, I have positioned further down, and I have designed the other two straps, the two sides in the top are used for the outer part of the belt, the two sides are used to lower down the inside of the belt. I spent brands and then I cut the 4 parts of the belt with a seam allowance of about half a centimeter.

Ho tagliato le marche, aprendo la stoffa, poi ho cucito le parti laterali della cintura, qui sotto vedete la parte esterna della cintura e più sotto la parte interna, è alta 3 cm esclusi i margini per la cucitura.
I cut brands, opening the fabric, then I sewed the side parts of the belt, see below the outside of the belt and below the inner part, is 3 cm high excluding margins for the seam.

Sul rovescio della cintura che va poi all’esterno ho applicato una teletta termoadesiva.
On the flip side of the belt that goes outside then I applied a fusible batt.

Ho cucito i fianchi a macchina e ho tolto le imbastiture, poi ho imbastito sul rovescio la parte esterna della cintura alla gonna, quella con il rinforzo, ho cucito, torlo le imbastiture e tagliato il tessuto in eccesso.
I sewed the sides in the car and I removed the basting, then I tacked on the reverse the outside of the waistband to the skirt, the one with the reinforcement, I sewed, torlo basting and cut the excess fabric.


Alla cintura così applicata ho cucito l’altra, quella che va all’interno della gonna, le ho messe diritto contro diritto, ho cucito e poi tagliato il tessuto in eccesso.
Applied to the belt so I sewed the other, the one that goes inside of the skirt, I put them right against right, I sewed and then cut the excess fabric.


Questo in alto è la parte laterale della cintura dove poi verrà fatta l’asola.
Ho stirato verso l’interno il cinturino non rinforzato, creando così la cintura della gonna che ho imbastito.
This is the top side of the belt where he will be made the buttonhole.
I pulled to the inside strap unreinforced, creating the belt of the skirt that I concocted.
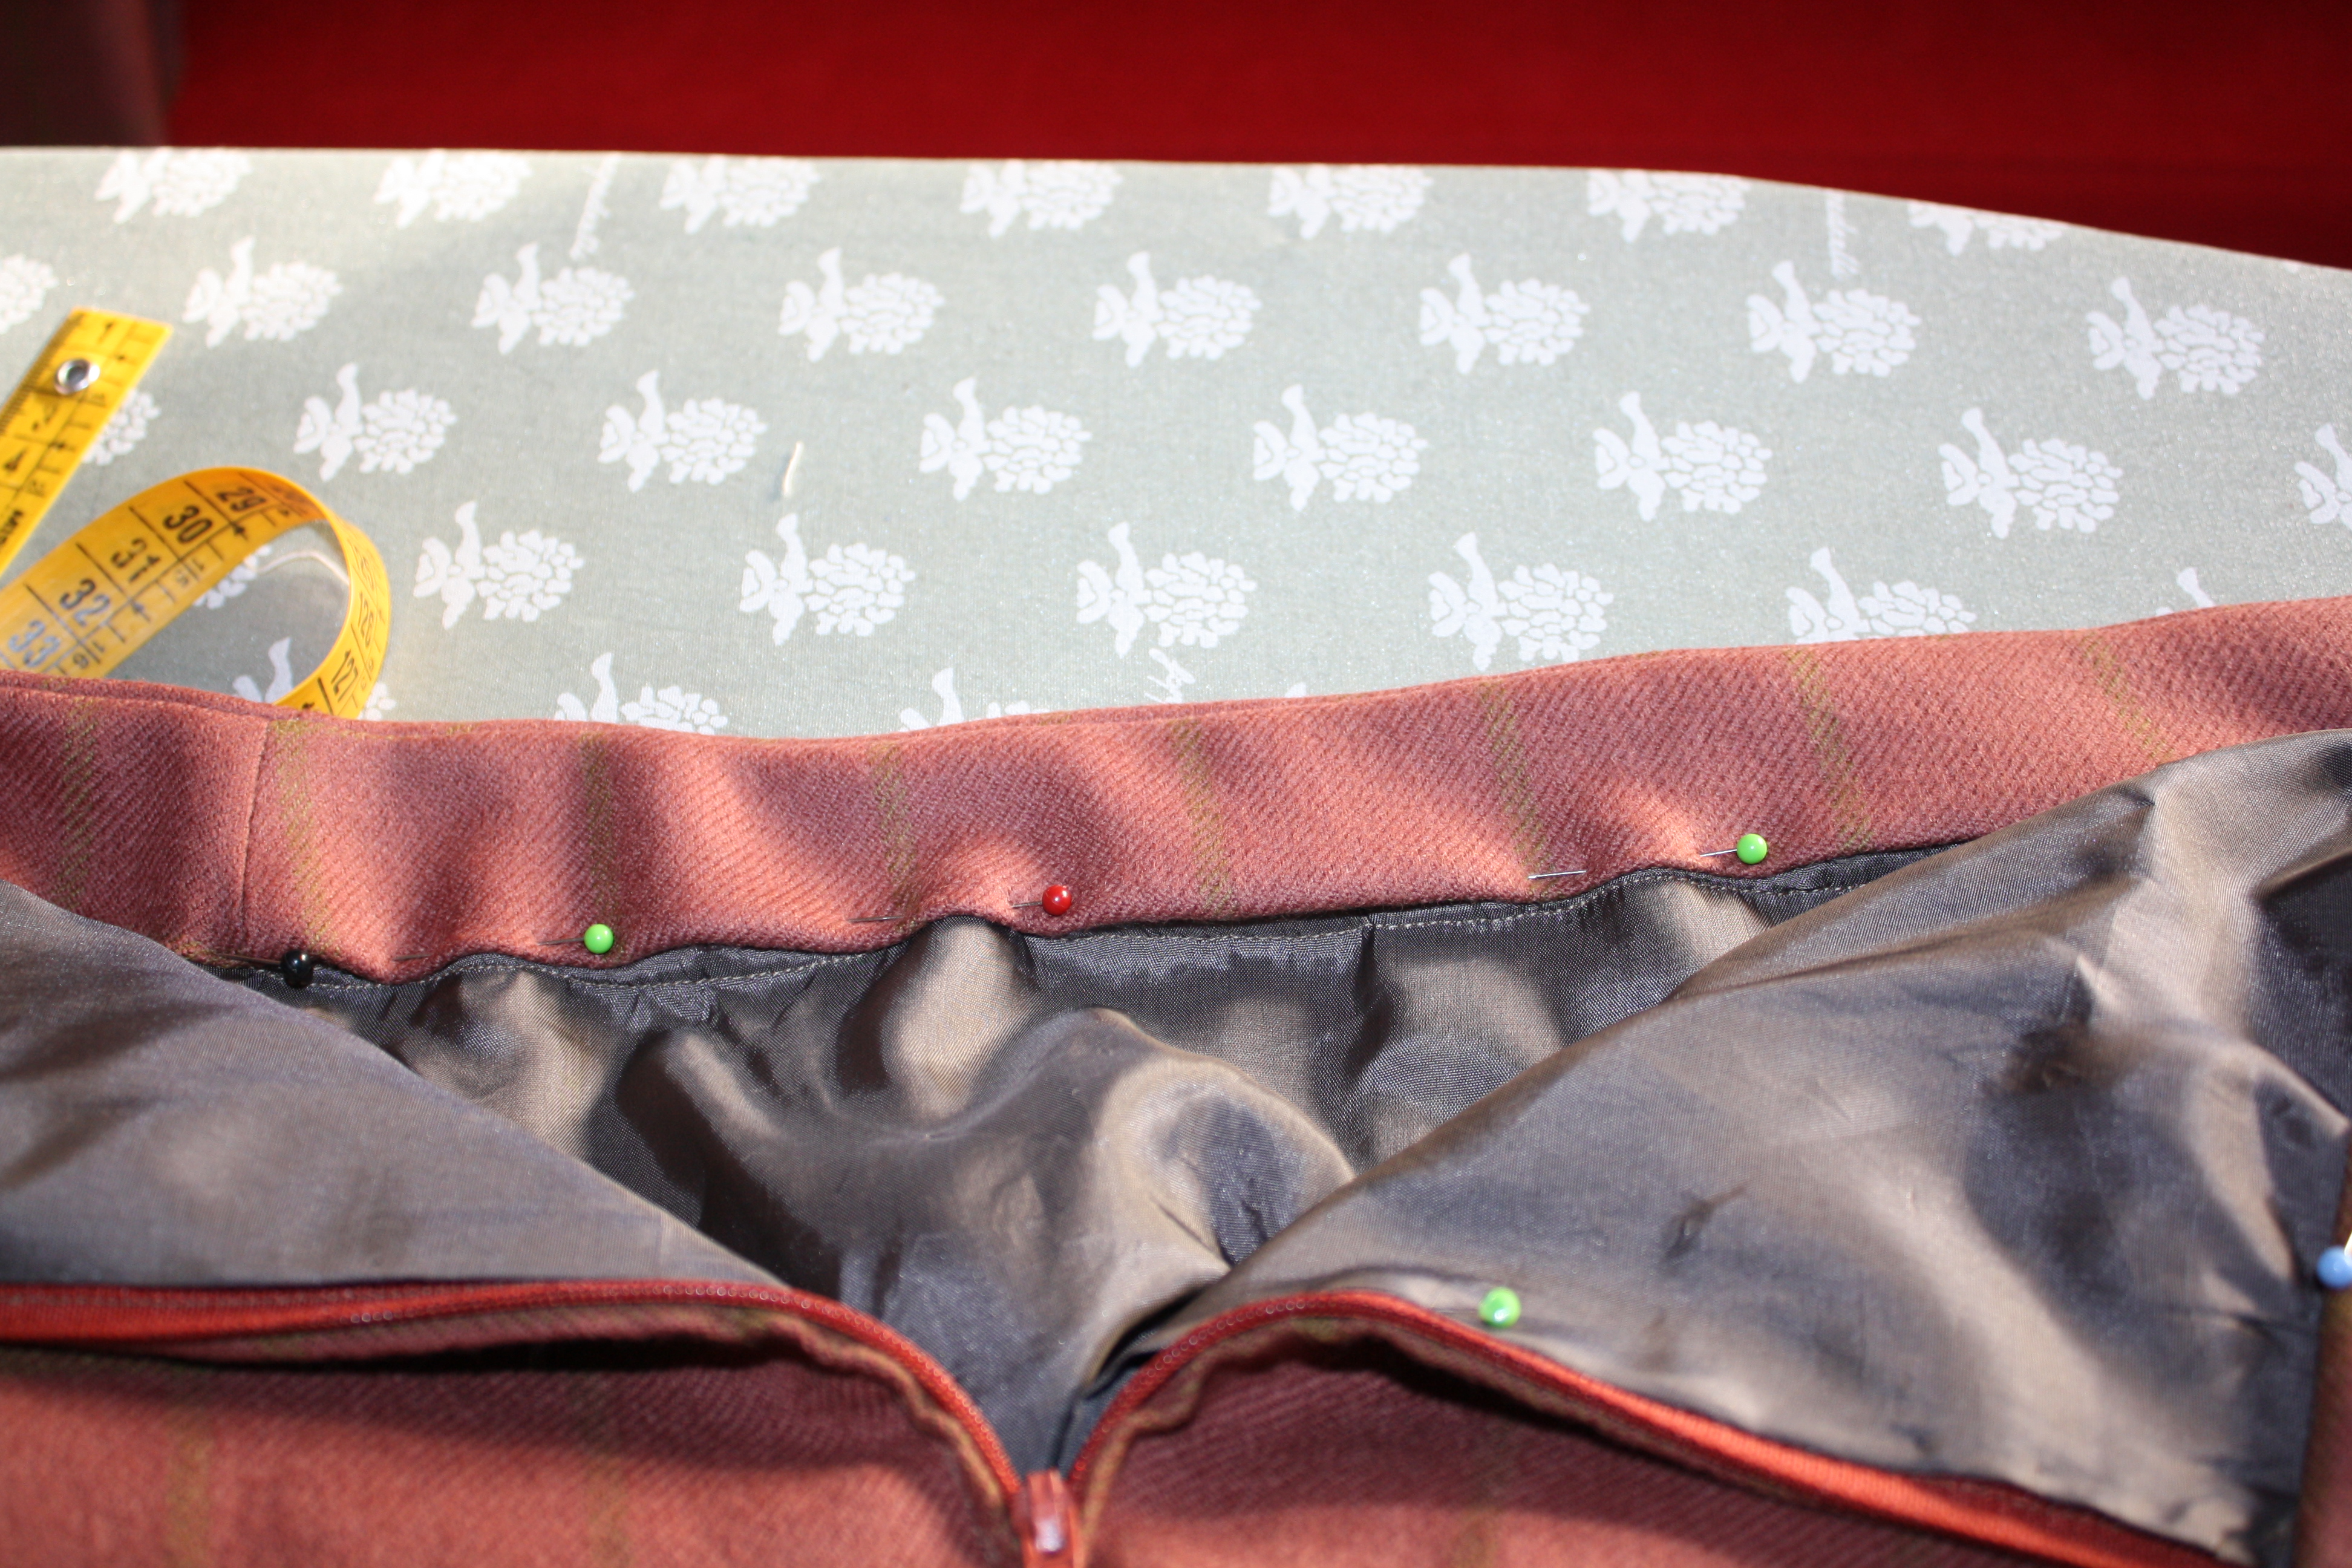


A questo punto ho cucito a macchina tutti i lati della cintura.
At this point I machine stitched all sides of the belt.


Ho fatto l’occhiello a macchina e ho cucito il bottone.
Spero di essere stata chiara nelle spiegazioni, se avete dubbi non esitate a contattarmi.
A presto
I did the loop in the car and I sewed the button.
I hope I have been clear in the explanations, if you have doubts, do not hesitate to contact me.
See you soon
Sabrina


dicembre 5, 2014 at 7:51 PM
Bella!!! Bello il tutorial e bellissimo il tessuto!!!brava!
dicembre 5, 2014 at 9:13 PM
Bene, allora vuol dire che è chiaro.
Grazie
dicembre 6, 2014 at 7:18 PM
che bella! un modello insidioso, ti è venuta proprio bene 🙂
dicembre 7, 2014 at 8:33 am
Grazie
dicembre 7, 2014 at 9:27 PM
Bella! ti sta proprio bene. Non ho capito pero´ come hai disegnato il fondo piega…e´ solo un rettangolo che si estende dal centro davanti? forse mi sara´ piu´ chiaro quando pubblichi la prossima puntata!
dicembre 8, 2014 at 1:54 PM
Grazie Silvia, sì è un rettangolo che si estende dal centro della gonna, ho fatto delle foto che metterò nel tutorial, che pubblicherò nei prossimi giorni.
A presto e grazie della visita
dicembre 8, 2014 at 5:42 PM
Bello il tutorial e bellissima la gonna – modello molto verstile. Ti sta molto bene!
dicembre 8, 2014 at 6:31 PM
Grazie Sasha
dicembre 8, 2014 at 6:38 PM
Il colore è bellissimo (e il modello ti sta molto bene!). Grazie per il tutorial, ho delle stoffe da parte e quasi quasi finite le feste potrebbe essere l’occasione di usarle…
baci 🙂
dicembre 9, 2014 at 6:26 am
Grazie Giulia,
manca ancora un pezzo del tutorial ma non ho ancora avuto tempo di scriverlo, questo fine settimana abbiamo fatto albero e presepe.
A presto
dicembre 9, 2014 at 4:41 PM
Che bella questa gonna!
Da qualche parte dovrei avere una stoffa adatta 🙂
attendo la seconda parte del tutorial.
dicembre 9, 2014 at 5:16 PM
Grazie, arriva a giorni, questo fine settimana siamo stati presi con albero e presepe.
Grazie per la visita
dicembre 11, 2014 at 4:30 PM
Sei stata chiarissima! Io sono al punto in cui comincio ad essere capace di realizzare qualcosa senza la mia insegnante, ma con delle foto e spiegazioni come fai tu sembra tutto più facile! Grazie 🙂
dicembre 12, 2014 at 6:21 am
Grazie, ti seguo da un po’ e avevo visto sui social che stavi seguendo un corso di cucito, sono contenta che il tutorial sia chiaro.
Grazie della visita
dicembre 12, 2014 at 12:08 PM
Bella! è questa la gonna di cui mi parlavi? Ti sta molto bene! Bravissima!!!
dicembre 12, 2014 at 1:42 PM
Sì è questa.
Grazie mille
dicembre 29, 2014 at 10:14 am
Bellissima!! La voglio fare anche io! Anche se sono ancor più appassionata dei kilt classici… si può avere un tutorial? 🙂 😀
dicembre 29, 2014 at 10:21 am
Grazie.
Sì hai ragione, avevo promesso il tutorial e poi sono stata letteralmente inghiottita dalle feste natalizia, tra oggi e domani: promesso